
I really mean it when I say that they are the best cinnamon rolls ever.
They have everything that makes a cinnamon roll great: they’re soft and pillowy, melt-in-your-mouth tender, loaded with just the right amount of cinnamon sugar, and topped with a delicious cream cheese frosting. And the best thing is? They are really simple to make and don’t need a mixer!
What makes these cinnamon rolls the best?
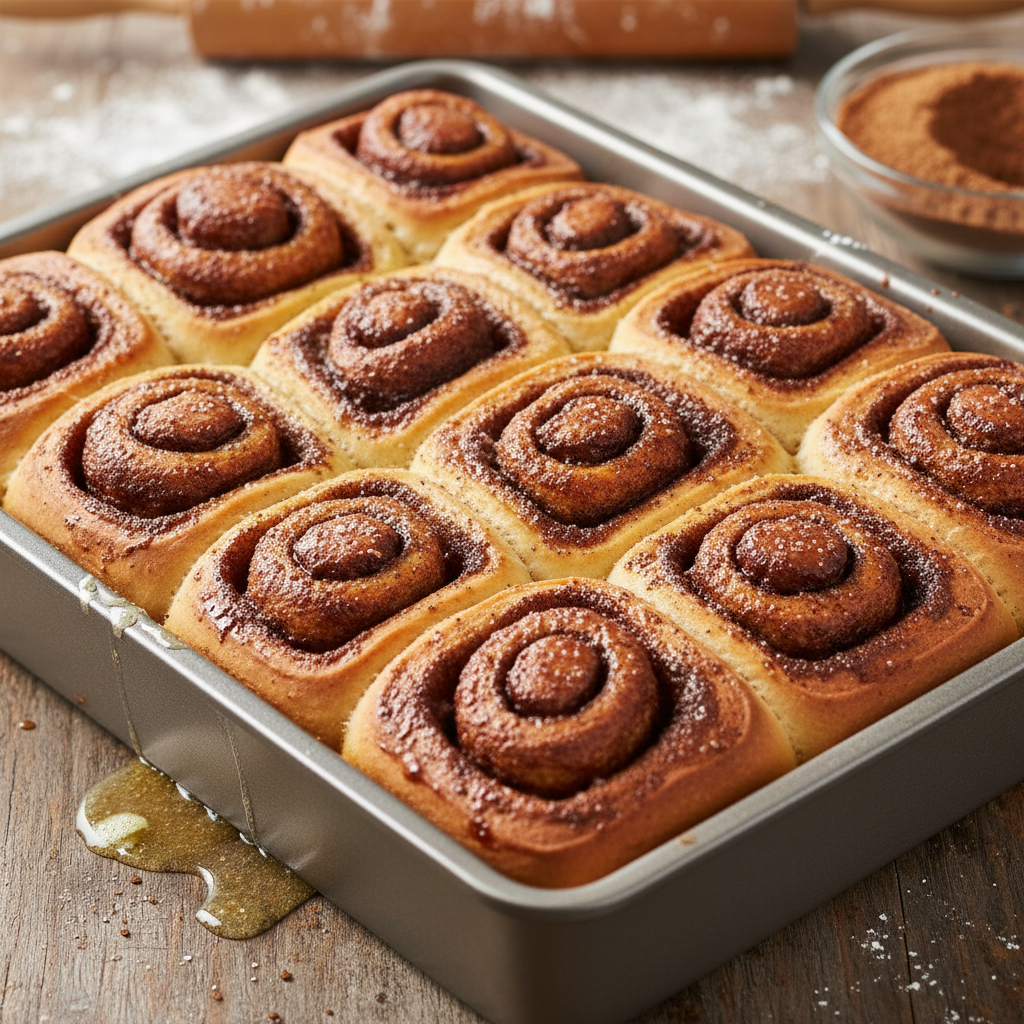
I know what you’re thinking: there are a lot of cinnamon roll recipes on the internet. What makes this one different?Well, first of all, just look at them:
Now, let’s speak about why they are so fantastic. I’ve been working on and polishing this recipe for years, and I hold myself to a very high standard. These cinnamon buns have everything:
- Unbelievable feel. This is the most essential thing to me. These cinnamon rolls are so light and fluffy that they almost melt in your mouth. They are not harsh, dry, chewy, or crumbly.
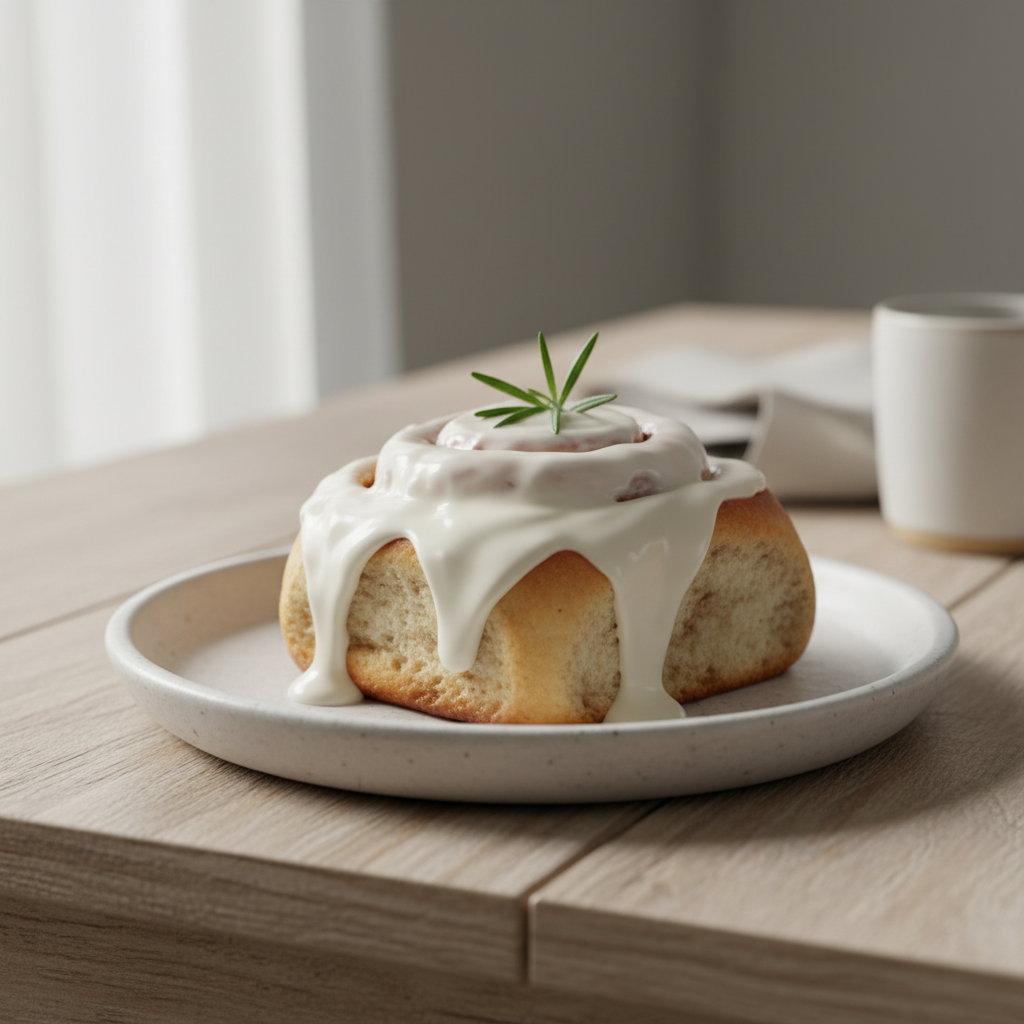
- Delicious taste. The bread itself is only a little sweet, and the buttery cinnamon sugar filling is exactly right. The icing is very good, and every bite has the right amount of cinnamon and sweetness. The cream cheese frosting on these buns is just perfect. It isn’t too sweet, it covers the rolls without hiding the swirl, and it isn’t too thick (which is something I really don’t like).
- The ideal swirl. When it comes to cinnamon rolls, let’s be honest: appearances matter! I think these rolls have the ideal amount of swirl that makes them look amazing but is still easy for everyone to roll.
- A recipe that is simple and doesn’t require much work. No difficult overnight rises, no pricey ingredients, and you don’t need a stand mixer to prepare them.
And if you still don’t believe me, I’ve given recipes for quick small-batch cinnamon rolls, chocolate espresso cinnamon rolls, and sticky pecan cinnamon buns before, and they’ve all gotten great reviews. Hundreds of people have told me how easy and tasty they are!
How to Knead the Dough for Cinnamon Rolls Perfectly
It’s really important to knead the dough correctly to get the right texture for cinnamon rolls, therefore let’s get into detail about it. You may either knead the dough by hand or with a stand mixer that has a dough hook (I like KitchenAid the best).
What is the point of kneading?
Kneading dough activates and strengthens the gluten in it. Gluten is what makes bread soft, supple, and flexible. Gluten strands are like tiny rubber bands that give bread its shape and let it grip onto air bubbles so it can rise properly. The gluten won’t be strong enough if you don’t knead the dough enough, and the rolls won’t rise properly. The rolls will be thicker and harder as a result.
The dough should be smooth, soft, and flexible, and it should pass the window-pane test.
Kneading by hand
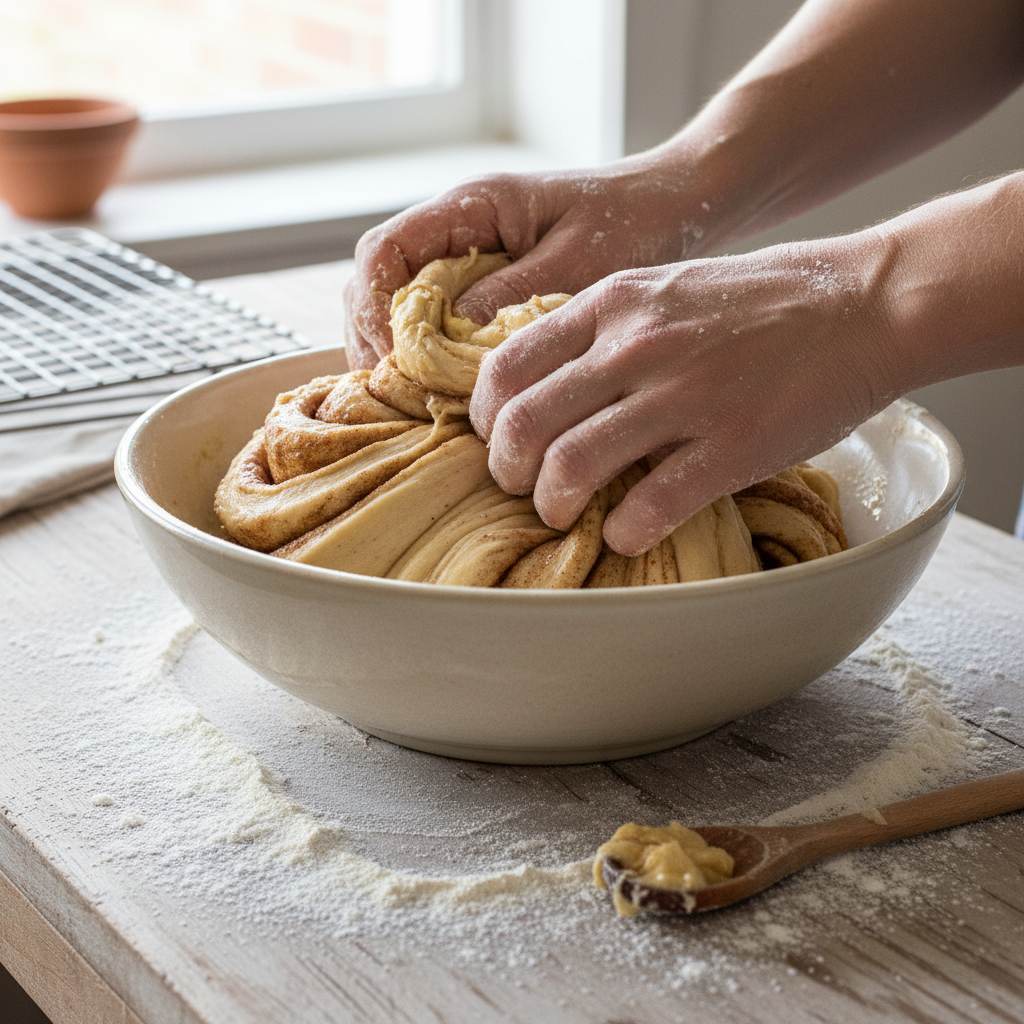
If you want to knead the dough by hand, start by mixing the ingredients in a bowl with a big spoon until they make a loose, shaggy dough. Then, knock it out onto a clean surface, like your kitchen counter, and start kneading. This is how it will go:
- At first, the dough will be quite sticky and wet, but you shouldn’t add any more flour.It is very normal for it to be sticky. Just be ready to get your hands dirty and have fun with it.
- You will need to knead for at least 15 minutes, using your hands to press and pull. To make this easier, I like to lock my elbow and turn my hips. Listen to music, watch TV, or a podcast to kill time.
- The dough will get less sticky the longer you knead it. You will see that the dough is significantly less sticky after about five minutes of kneading. You might need to wash your hands to get the sticky bits off. This happens because kneading makes the flour soak up more of the liquid. If the dough is still too sticky after 5 minutes and with clean hands, add 1 to 2 tablespoons of flour and keep going.
- Knead the dough until it passes the window-pane test.The dough will get smoother and more stretchy the longer you knead it. It will also be easier to knead. Do the window-pane test after about 15 minutes. Hold a small piece of dough between your thumbs and forefingers and slowly pull it into a thin sheet. You should be able to stretch it out so that you can see light coming through without it breaking.
Using a stand mixer to knead
It’s much easier to knead with a stand mixer! Use the dough hook attachment and knead on medium-high speed for around ten minutes. At first, the dough will be wet and sticky, but as time goes on, it will become less sticky, peel away from the sides of the basin, and form a smooth mass. It should be very smooth and stretchy by the end of the 10 minutes and pass the window-pane test.
HOW TO MAKE THE BEST CINNAMON ROLL SWIRL
Let’s quickly go over how to get the swirl in a cinnamon roll just perfect, since it’s such a crucial part of the roll. Older recipes say to roll the rectangle of dough with the cinnamon sugar filling into a log and then cut it into rolls using a sharp knife. A lot of modern recipes say to use floss instead of a knife to make a smoother cut that keeps the rolls’ round shape.
But I don’t like either of those ways! It’s hard to roll up the whole rectangle properly, especially if the dough is soft. Also, cutting the long log into rolls gets really dirty, even if you use floss.
What do I suggest? After you’ve put the filling on the dough rectangle,
- Cut the rectangle into long strips of equal length with a sharp knife or pizza cutter (I like the pizza cutter better). Using a long, clear ruler will help with this.
- Individually wrap the strips into rolls, making sure to keep the pressure even as you do this.
1) It’s easier to roll thin strips than a big rectangle. 2) The rolls always come out perfectly tight and round because you have more control than when you cut a log with a knife or floss. 3) It’s also a lot less messy.
How to Make the Best Cinnamon Rolls
A few crucial guidelines to get this dish just right:
- Weigh out the ingredients on a scale instead of using measuring cups, especially the flour. It’s common to put too much flour into a measuring cup, which will make the rolls dry. If you must use a measuring cup, fluff up the flour and place it into the cup one spoon at a time, and don’t cram it tightly
- Make sure your yeast isn’t expired. Yeast can expire easily, especially if left unsealed at ambient temperature
- Make sure the milk is warm but not hot (around 110F). If the milk is excessively hot, you risk killing the yeast right at the beginning
- Knead properly and thoroughly, and avoid adding more flour (see section above for further instructions on kneading)
- Let the dough properly rise. The initial rise should get the dough to more than double in size, and it should spring back partway when softly probed with a finger. The second rise happens after shaping the rolls and should get the rolls quite puffy looking
- Be mindful of room temperature. If it is cooler, the dough will take longer to rise. If it is heated, it will rise quickly and the filling can spill out. A warm 75-80F temperature is ideal
- Don’t overbake. A light golden hue on the rolls is what you need, and the rolls should spring back if lightly probed. Overbaking might cause them to dry out
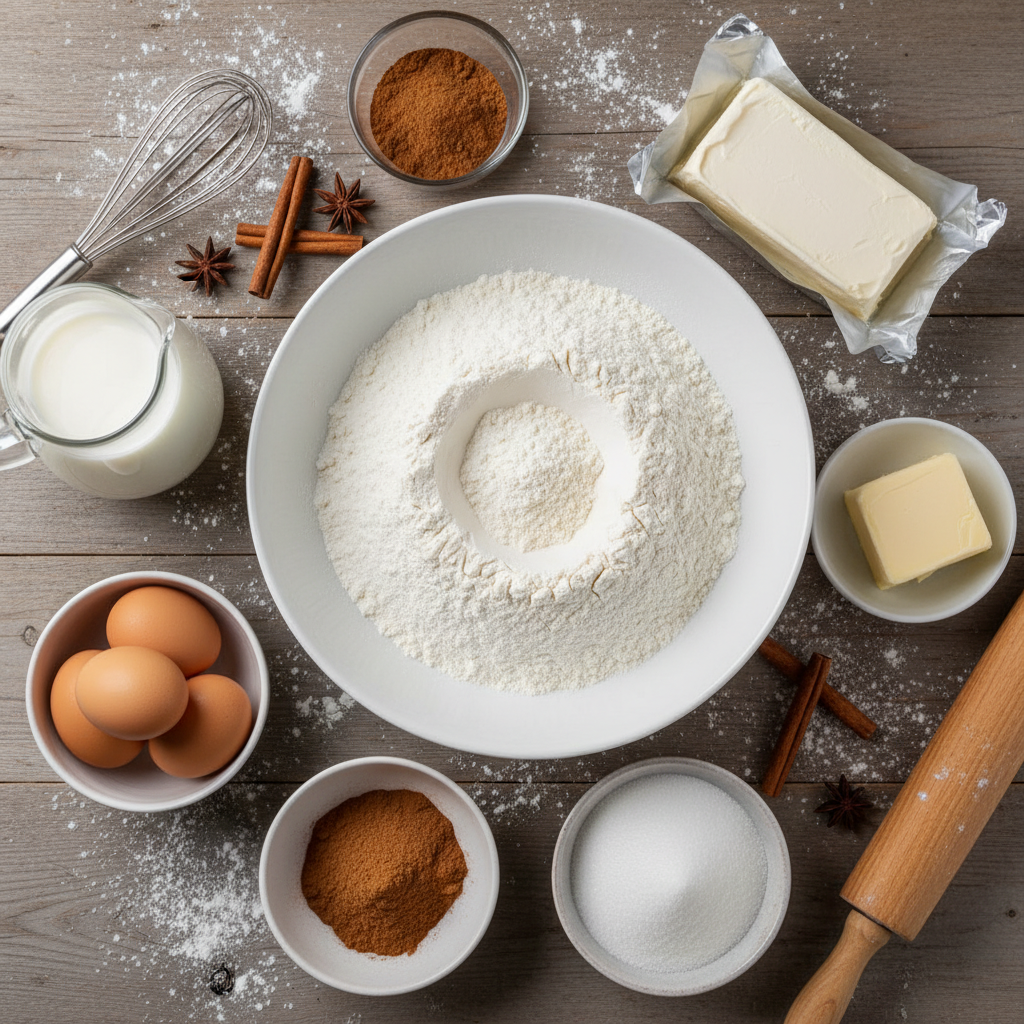
Dough:
- ◯ 1 ⅓ cup whole milk (320g)
- ◯ 4 teaspoons active dry yeast (or instant yeast)
- ◯ ½ cup granulated sugar (100g)
- ◯ 5 cups all purpose flour (650g)
- ◯ 2 large eggs, room temperature
- ◯ 2 teaspoons salt
- ◯ ½ cup unsalted butter, room temperature (113g)
Filling:
- ◯ ½ cup unsalted butter, softened (113g)
- ◯ 1 cup light brown sugar, packed (200g)
- ◯ 2 tbsp cinnamon powder
- ◯ ¾ tsp salt
Assembly & baking:
- ◯ ½ cup heavy cream (120g), room temp
Cream Cheese Icing:
- ◯ 4 oz cream cheese, room temperature (113g)
- ◯ ¼ cup unsalted butter, room temperature (56g)
- ◯ ¼ cup heavy cream (60g)
- ◯ 1 cup icing sugar (100g)
PROCESS WITH PICTURES
The recipe card below has all the information you need, but let’s go over the stages using pictures to help you picture everything.
- Dough:
Microwave milk for 20-30 seconds until it is warm to touch (~100-110F). Add it to a bowl with the yeast, whisk, and rest for 10 minutes or until the mixture looks frothy - Add the rest of the dough ingredients (sugar, flour, eggs, salt, and room temperature butter) to the same bowl
- Kneading by hand: Use a large wooden spoon to incorporate everything and bring it into a shaggy dough. Tip out onto a clean work surface, then use clean hands to knead the dough with a push-pull motion for 15 minutes. The dough will be sticky to begin with, but don’t add extra flour and keep kneading until it becomes soft, smooth and very flexible. After 5 minutes, scrub your hands to remove sticky dough crumbs from them. If the dough still feels sticky, add just 1-2 tablespoon flour and keep kneading. Eventually the dough will not be sticky, and should pass the window-pane test
- Kneading using a stand mixer: Transfer the dough ingredients to the bowl of your stand mixer and knead using the dough hook attachment on medium high speed for 7-10 minutes, until the dough becomes smooth, pulls away from the edges of the bowl, and becomes elastic enough to pass the window-pane test
- Transfer to a clean basin coated with some oil, cover with cling film and rest in a warm location for 60-90 minutes until the dough has at least doubled in size, and springs back partly when lightly poked with a finger
- Filling:
While the dough is rising, prepare the filling by mixing softened butter with cinnamon, sugar and salt. If it feels hard to blend, microwave for a few seconds and mix again. It should be a spreadable consistency - Assembly & baking:
Line a 9×13″ baking pan with parchment paper - Once the dough has risen, punch it down and transfer it to a clean surface coated gently with flour. Using your hands and a rolling pin, roll it into a 12×18″ rectangle. The dough will be fairly soft so won’t need much pressure
- Use a spatula to spread the filling evenly around the rectangle
- With the 12″ side towards you, divide the dough into 12 strips (each strip will be 1″ wide and 18″ long). This is simplest done if you use a long acrylic ruler and a pizza cutter
- Roll each strip tightly into a cinnamon roll, then put to the baking tray. You will arrange the rolls in a 4×3 arrangement
- Once all rolls are made, let them rest in a warm location for another ~30-45 minutes until they seem a puffed out and spring back partly when gently prodded
- In the last 20 minutes of the second rise, preheat your oven to 350F (conventional / no fan)
- Right before putting the rolls in the oven, pour the ½ cup heavy cream over them carefully. It will get soaked up when the rolls bake
- Transfer to the oven and bake for 22-25 minutes until the rolls develop a light golden color and feel firm to touch. If in doubt, I think it’s best to slightly underbake for a gooey texture, versus overbaking and having dry rolls
- Remove from oven and let the rolls rest for 10 minutes
- Cream Cheese Icing:
Whisk together the cream cheese, butter, cream and icing sugar until creamy to make the cream cheese icing - Spread liberally onto warm rolls
- Serve & enjoy!
For more notes, tips, tricks, images, and videos, read the whole blog article below.