
Extra Crispy Irish Oven-Fried Chicken Thighs
Let me tell you about these crunchy Irish chicken thighs.
Okay, so here’s the deal: I’ve definitely made these super crispy Irish oven-fried chicken thighs more times than I should admit (don’t tell my doctor). It was a cold, dreary night when I first tried this, and I just needed some Irish-style comfort. My friend Aoife, who is from Galway and is a bit of a culinary legend, swore by this method. I have to be honest: I was doubtful. Fried in the oven? Would it have that right crunch? Well, let’s just say that after one bite, all my reservations went away. Now I make these whenever I need to feed a bunch of boisterous people or just want something that feels like a hug in chicken form.
A quick note: I once tried to cook these during a blackout using a camping stove and a flashlight put between some cups. It didn’t go well, but the tale always makes everyone laugh at family gatherings. In any case, let’s get started.
When the weather is bad and I need a pick-me-up, or when my nephew is coming over and asking for “the crunchy chicken,” I cook this. My family goes crazy for it since it’s so crispy (you can hear the crunch from the next room). And to be honest, it’s a lot easier than deep frying. You don’t have to deal with oil splatters or the stench that makes you feel like you’re at a chip shop for days.
I used to botch up the coating all the time. It would stick to the baking tray and I would lose half of my crunch. I actually think it works better with a wire rack. Who knew? Plus, you get to feel like you’re being a little healthier, which is a win for me. And if you’re like me, you’ll appreciate how you can just throw it all in the oven and go about your evening (or, you know, look up more chicken thigh recipes).
Ingredients
makes 4 servings
Prep time: 20 minutes
Cooking time: 40 minutes
Total: 50 minutes
These Irish oven-fried chicken thighs are exceptionally crispy and seasoned with traditional spices. They are roasted until they are golden brown. A healthier version of fried chicken that is great for a warm supper.
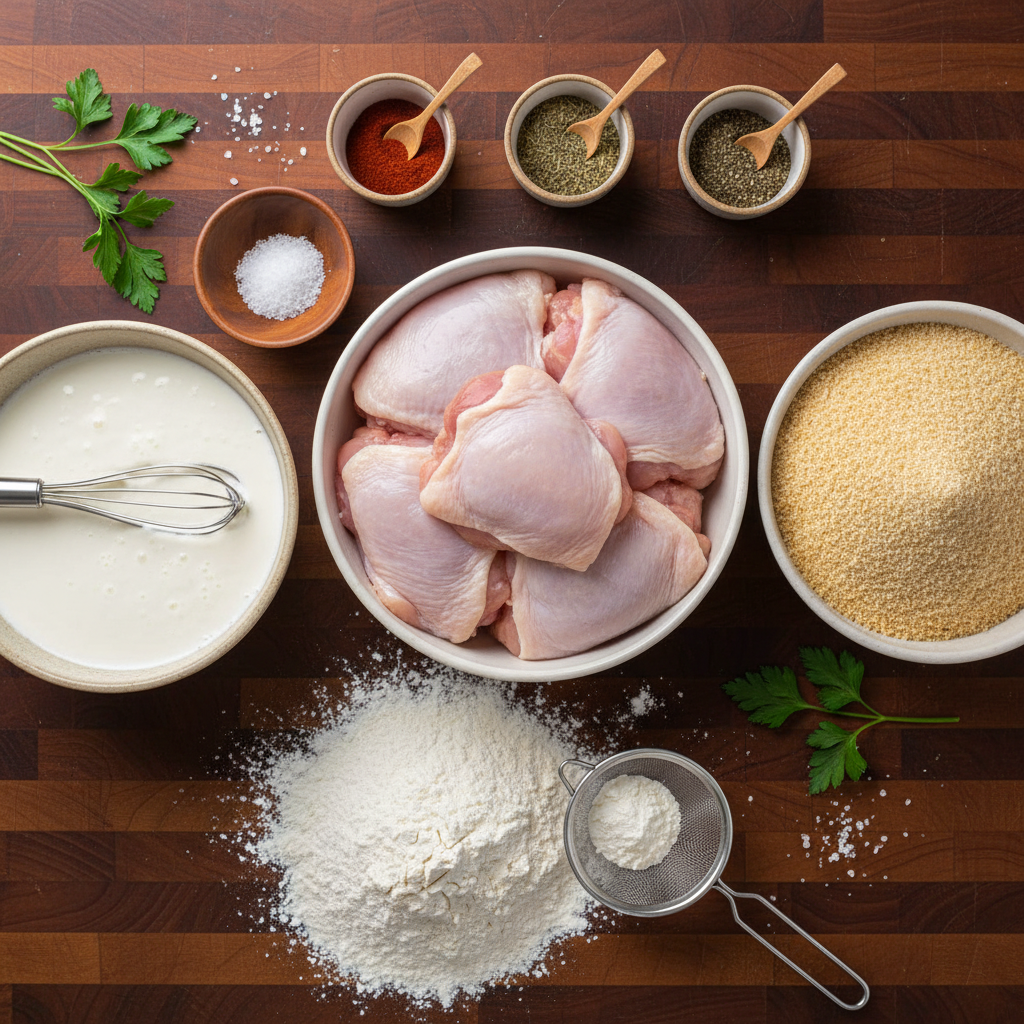
- 8 chicken thighs with bones and skin
- 1 cup of buttermilk
- 1 ½ cups of panko bread crumbs
- 1 cup of flour for all purposes
- 2 tablespoons of salt
- 1 teaspoon of black pepper
- 1 teaspoon of smoked paprika
- 1 teaspoon of dried thyme
- ½ teaspoon of garlic powder
- 2 tablespoons of butter that has melted
Step-by-Step Cooking Instructions
- Set your oven to 425°F (220°C) to get it ready. Put parchment paper on a baking sheet and lightly oil it.
- Put the chicken thighs in a big dish with buttermilk and let them sit for at least 15 minutes to make them more soft and add flavor.
- Mix together panko breadcrumbs, flour, salt, black pepper, smoky paprika, dried thyme, and garlic powder in a shallow plate.
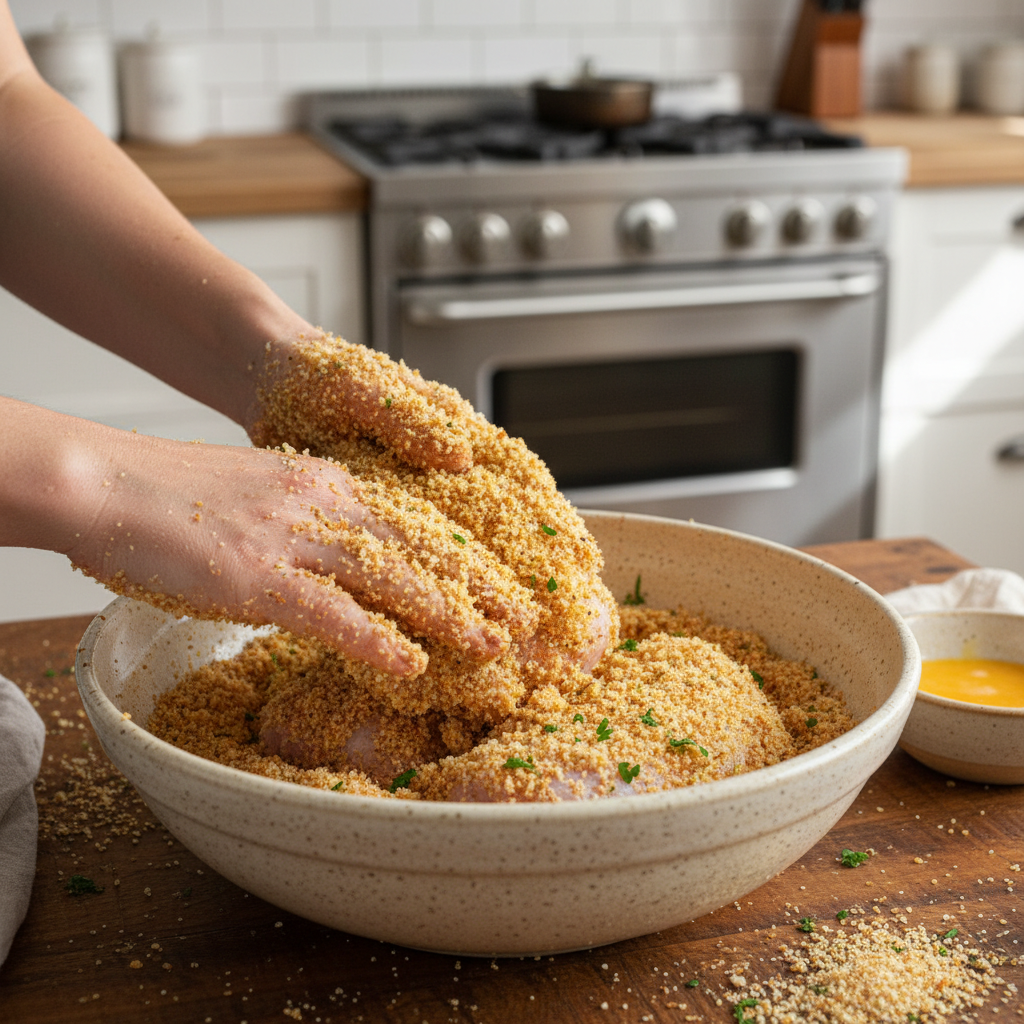
- Take each chicken thigh out of the buttermilk and let the extra drip off. Then, dip it in the breadcrumb mixture to coat it evenly.
- Put the coated chicken thighs on the baking sheet that you prepared. For added crispiness, drizzle melted butter on top.
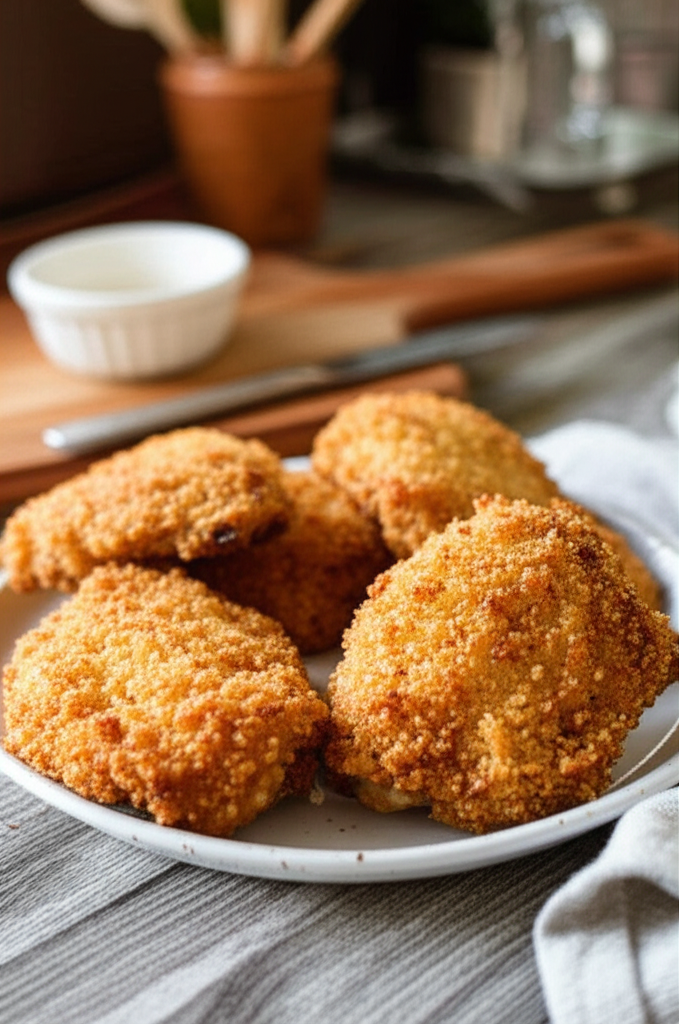
- Bake for 40 minutes, or until the chicken is golden brown and fully cooked (the inside should be 165°F/74°C). Serve it hot.
Additional Tips and Variations
◯ 6 chicken thighs with skin and bones (although boneless works too if I’m in a hurry; they just aren’t as juicy)
◯ 1 cup of buttermilk, or if you forgot to buy it, mix milk with a dash of lemon juice and let it sit for a minute. It works just fine!
◯ 2 cups of fresh breadcrumbs (panko is the best, although old soda bread blended in the blender is also very good)
◯ 2 teaspoons of smoked paprika (plain paprika works, but the smoked kind is the best)
◯ 1 teaspoon of dried thyme (fresh thyme is great, but not everyone has it all the time)
◯ 1/2 teaspoon of garlic powder (not required, but I use it for good luck)
◯ 1 teaspoon of salt (my grandma swore by Maldon, but any sea salt would do)
◯ ½ teaspoon of black pepper
◯ 2 tablespoons of melted butter (or a nice sprinkle of olive oil if you want to be fancy)
◯ For the rack, use cooking spray or a little more butter.
Put the chicken in a marinade.
Put the thighs in the buttermilk (or your lemony milk alternative), cover them, and let them sit for at least 30 minutes. Overnight is great if you remember. I sometimes forget and do 15 minutes, which is still fantastic, to be honest.
Set your oven to 220°C/425°F. Make it really hot, then put a wire rack over a baking tray. A crumpled piece of foil will work if you don’t have a rack, but it will be a lot messier (believe me).
Get your mix of breadcrumbs ready.
If you want to save time, use panko to make the bread crumbly. Then add the paprika, thyme, garlic powder, salt, and pepper. Add the melted butter and stir it in. This is where I usually sneak a sample. It won’t get saltier later if it isn’t salty enough now.
Put a coat on the bird.
Take off the extra buttermilk from each thigh. Don’t be shy; press them firmly into the breadcrumb mix. Get into all the little spaces; it should look like a real winter coat.
Put on the rack.
Put the coated thighs on the oiled rack or foil. Spray them with oil or brush them with a little more butter. In my opinion, more butter means more crunch.
Bake.
Put them in the oven for 35 to 45 minutes, or until they are brown and the juices run clear. If some crumbs fall off, don’t worry; just pick them up and put them back on. No one is judging here.
Take a break (if you can).
I typically wait five minutes before I start eating, but sometimes the smell gets the best of me.
If your breadcrumbs are a little pale, grill them for the last two minutes. Just watch it so you don’t burn the whole thing (I speak from experience).
If you don’t want to microwave the insides later, don’t use too thick thighs. The medium size is the best.
You might want to try gluten-free breadcrumbs instead. I did once, and they taste okay, but they brown faster.
Once, I added grated cheddar to the crumbs. It was okay, but it got a little gunky. Maybe just put it on after?
To make it spicy, add some cayenne or chili flakes. Great for adults, but not so much for youngsters.
Rosemary instead of thyme in the herby experiment. This actually tasted great with roast potatoes.
A wire rack on a baking pan is best for getting the most crunch, but if you don’t have one, a lined tray and flipping halfway will work. Not as good, but still decent.
A food processor is wonderful for making breadcrumbs, but if you have strong arms, a bag and a rolling pin can work too. A little bit of exercise, though.
Put any leftovers in a tub that won’t let air in and put it in the fridge. Honestly, they’re even nicer the next day, whether they’re cold or warmed (but not in the microwave, because that makes them sad and floppy). They will endure for 2 to 3 days, however in my house, they usually only last a day!
Serving Suggestions and Common Tips
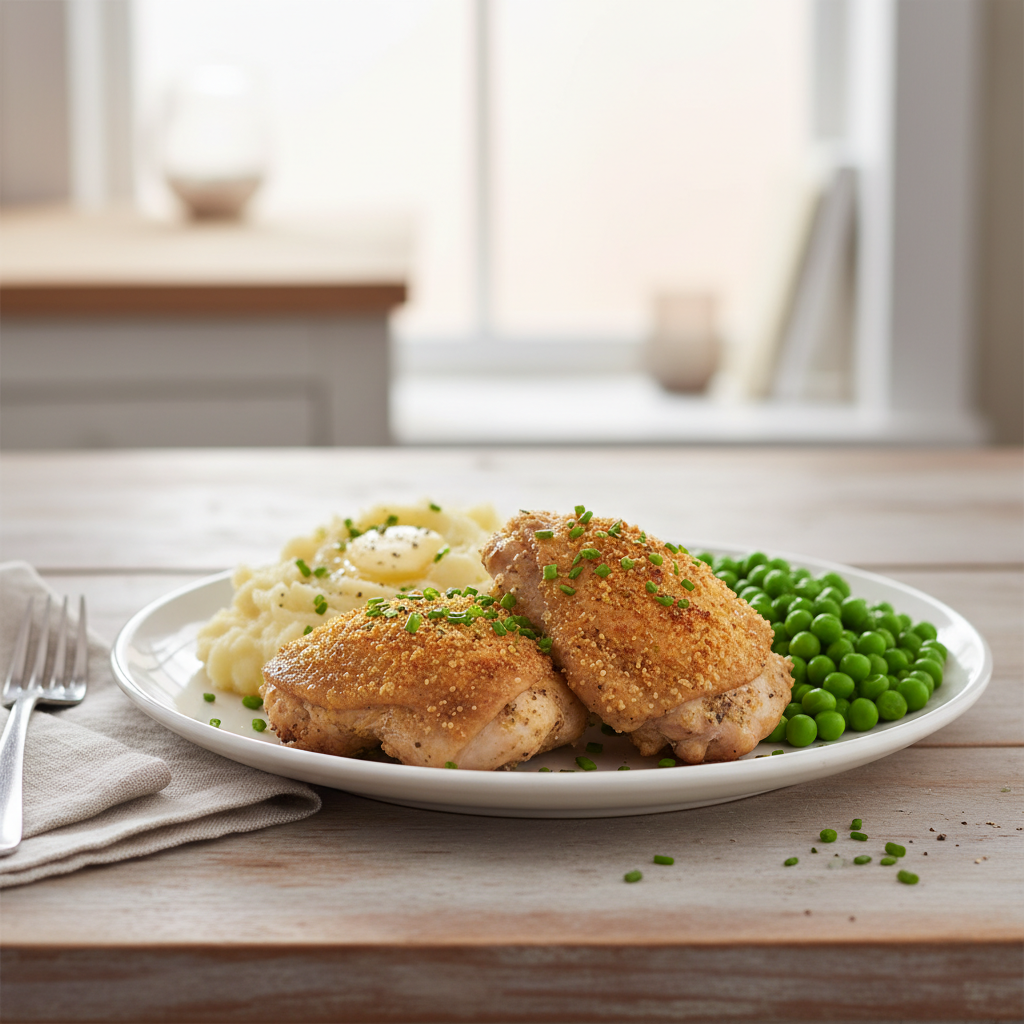
I usually stick with the basics: peas and mashed potatoes. I’ll sometimes make a quick cabbage slaw to go with all the crunch. It needs a little zing to cut through it. I know it’s not really Irish, but my dad always wants beans. Also, a little Kerrygold herb butter never harmed anyone.
If you don’t let the buttermilk sit for long enough, the magic won’t happen.
I once forgot to grease the rack, and it was a complete mess. The chicken stuck to itself. Don’t do it.
Let them sit for a few minutes to let the fluids settle. If you don’t, half of your crunch will end up on the chopping board.
Frequently Asked Questions
Can I use drumsticks instead of thighs?
Definitely. Check on them after 30 minutes because they cook a little faster. If I have a random pack from the store, I sometimes mix the two.
Why use buttermilk? Do I truly need it?
It gives it flavor, makes it more soft, and helps the crumbs stick. But really, milk with lemon juice or yogurt mixed with water works just as well.
What makes it crunch?
Don’t scrimp on the butter in the crumbs, and don’t put too many on the tray (the steam makes them less crisp). If you can, use a rack.
Can I put these in the freezer?
Yes, freeze before baking, then cook from frozen. Just add 10 to 15 minutes. If you freeze them after baking, heat them back up in the oven to get them crisp again. Not as good as fresh, but still better than takeout, in my opinion.
Is it possible for me to make this gluten-free?
Sure, gluten-free panko or your favorite gluten-free bread will work. Just keep an eye on them because they brown faster.
Nutrition Information Per Serving
Information that is close to right for one serving
- Calories: 420
- 29 grams of protein
- 22 grams of fat
- 0g of saturated fat
- 0g of trans fat
- No cholesterol
- 0mg of sodium
- 0 mg of potassium
- Total Carbs: 28 g
- 0g of fiber
- Sugar: 0g
- 0g of net carbs
- Vitamin A: 0
- Vitamin C: 0 mg
- Calcium: 0 mg
- Iron: 0 mg
Nutrition Warnings
The number of servings provided is an estimate. The actual number of servings will depend on how big you want them to be.
The nutritional values indicated are just basic guidelines and are based on one serving made with the specified ingredients, not any optional ones. Depending on the brand and type of ingredients used, the actual macros may be a little different.
Follow the recipe to find out how much one serving weighs. Weigh the final recipe, then divide that weight (not including the weight of the container the food is in) by the number of servings you want. The answer will be how much one serving weighs.